 |
Adding a Vent Cover to Your RV |
| |
 |
| |
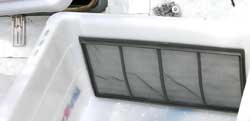 |
After talking with several seasoned RV travelers and reading advice from several recreational vehicle forums, I decided to install Shell White Roof Vent Covers over my four roof vents. I think these would be great for any trailer or motorhome. I used to think they would only be useful to over my four roof vents. I think these would be great for any trailer or motorhome. I used to think they would only be useful to |
|
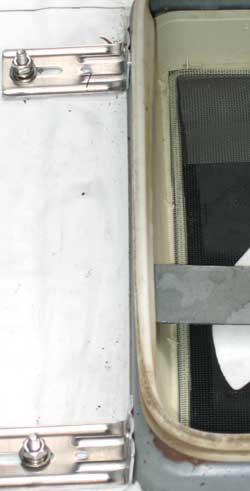
keep a vent open while moving down the road but have since learned I can keep the vent open in the rain and keep debris from landing inside my vent. Note all the pine needles on the roof in the first photo. I ended up purchasing two different types of RV vent covers. Both on sale at Camping World
Internet Only Specials. I try to watch the specials for the best deal and shipping is only $1 when your order totals $75 so I've never paid more than $1 for shipping. I try to watch the specials for the best deal and shipping is only $1 when your order totals $75 so I've never paid more than $1 for shipping. |
 |
| |
 |
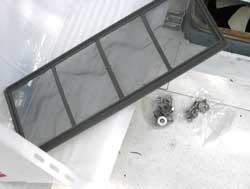
This first vent pictured above is for vents with no high speed fan. It has a removable insect screen, however in practice, you would have to remove the four mounting bolts to remove and clean the screen. I decided that I could put up with that once per year chore. The instructions are clear, no drilling into the roof, instead you must drill a hole for each mounting "L" bracket |
| |
into the side wall of the vent. For this basic vent cover you need only drill one hole for the "L" bracket however for the high-speed fan vent cover below, you must drill two smaller holes. I like this first mounting method much better than the second because this first "L" bracket is mounted to the vent using a bolt, while the second uses two self-tapping sheet metal screws. I think the bolt method is stronger. |
 |
| |
 |
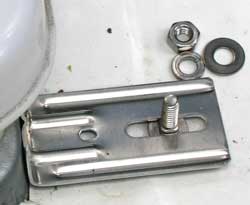
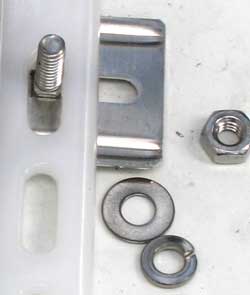
Before mounting the "L" bracket to the vent sidewall, you first must assemble the cover carriage bolts to the bracket because you would not be able to install them without bending the bracket if you wait until the bracket is installed to the sidewall. You will want to be sure that you aligne the brackets so the cover will give the raised hatch cover plenty of clearance. You will have plenty of margin for error here with three oval slots to set the vent cover onto the bolts.
Note the metal tank riser cap in the first photo. When I first purchased this used fifth wheel it had plastic riser caps which had literally turned to powder and had to be replaced. I chose metal to avoid the "dissolving plastic-style" which were originally installed. Again, I purchased from CampingWorld.com . . |
| |
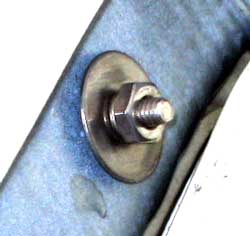
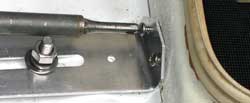
Here is a closeup view of the bolt connecting the "L" bracket to the vent side wall. The assembly consists of a protective flat washer, lock washer and bolt. |
 |
| |
 |
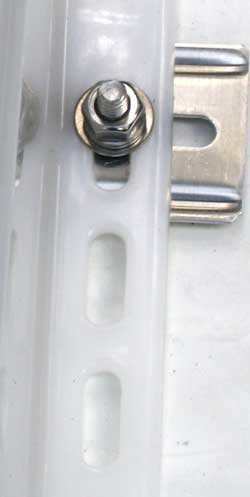
Note the choice of mounting holes in the cover to the bolt and "L" bracket. This gives plenty of places to install the cover further forward or rearward. |
|
The MaxxAir Fan/Mate Model 800 Ceiling Fan/Vent Coverdoes NOT have these hole choices. You must be very exact in your "L" bracket installation because there is only one hole, not oval to install the bolt. This means carefully measurement between distance of the forward and rearward "L" brackets so the bolts will meet this round holes exactly. Both covers attach the cover using a flat washer, lock washer and bolt.
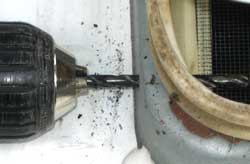
The photo below shows drilling two holes per "L" bracket self-tapping sheet metal screws for the high-speed fan cover. |
 |
| |
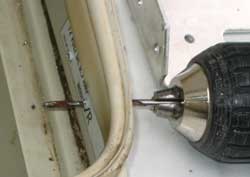 |
Note the small hole on the bracket against the roof top. A third self-taping sheet metal screw was provided to affix the bracket to the roof. I dislike the idea of drilling into my roof and since this vent sits directly behind the air conditioning unit, I felt this offered protection from the wind while driving and hopefully was not needed. |
| |
The theory is to leave your vents open, even when raining, turn on the exhaust fans which will draw fresh air into the passive open vents. So I can turn on the high speed exhaust fan in the living area and draw air into the bedroom passive vent while I sleep without the noise of the fan. |
 |
| |
 |
|

