 |
Installation of Satellite
Internet .. part 3 |
 |
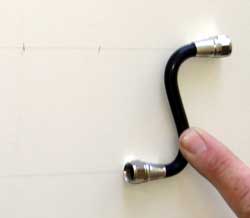
The final project is to create a professional cable passage through the trailer wall. Because the walls are about 2 inches thick an "S" cable must be made to pass through the wall to allow clearance for the interior and exterior fixtures. |
 |
|
|
 |
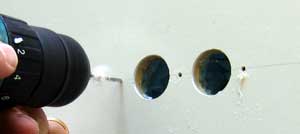
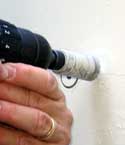
Make sure the holes will match the exterior fixture. Check and double check because these are going to be 3/4" holes. It would be nice to know that there are no electrical cables behind this wall. |
|
The holes are drilled, plugs removed then the foam is removed to create a passage from the exterior to interior holes. |
 |
|
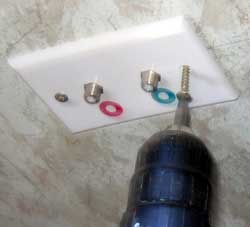 |
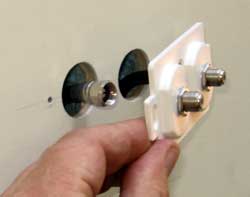
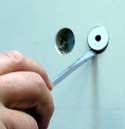
Pilot holes are drilled in the exterior and interior walls for the fixture mounting screws.
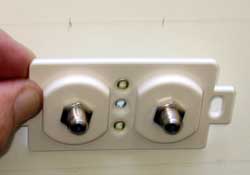
You can clearly see the blue and red markings for the cables. Red for transmit and blue for the receive cables. |
|
| |
Carefully tighten the cable to the exterior (shown) and interior fixtures without over tightening. |
 |
|
| |
|
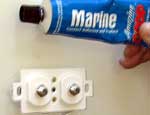
Use Marine Goop to seal behind the exterior fixture before the final screws secure the fixture to the wall. |
|
| |
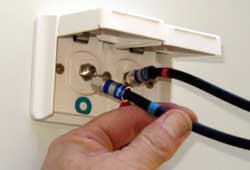
Completing the cable connection to the exterior fixture. Careful to match the blue (receive) cable to the blue male thread and the red (transmit) cable to the red male thread. |
 |
|
| |
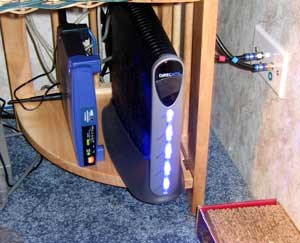 |
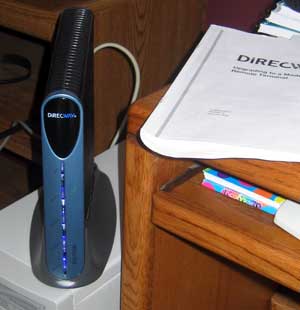
The final project is professionally completed by connecting the DW6000 modem to the transmit and receive cables then using Cat5 cable to connect to the Linksys WRT54G wireless router. The router |
|
|
| |
sits about two feet from my computer so I have used a Cat5 cable to connect to the router while Gwen sits at her computer station with her laptop and accesses the router wirelessly at 54Mbps. We can both access the Internet at the same time because the router networks our computers. Of course we have password protected our router to be sure others in the resort don't get free wireless access to our network. |
|
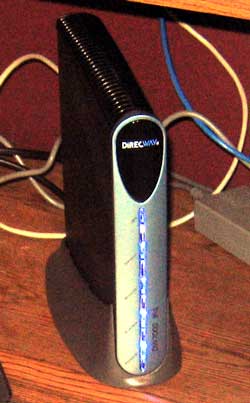
| January 28, 2006: Update ... today I installed the DW7000 modem replacing the DW6000 modem which was originally supplied. This modem should be faster and has other features to make the system work better. So far, it's not working as well as the DW6000 so I hope things improve shortly. It is identically the same physical size as the DW6000, has the same 5 led lights and connects to the system with the same wires. This new system should have up-to 1 meg download and up-to 200K upload speeds. On my first test, it did not perform as well as the DW6000 for speed but I think it must "fine-tune" itself. If you are considering the purchase of a Direcway system, the DW7000 is the only modem offered now. I'll mention any improvements over the DW6000 as I see them. |
 |
|
|
 |
February 9, 2006: It has been a struggle since upgrading to the DW7000 modem. The first modem installed perfectly but then degraded to a trickle in only an hour. I spent many hours on the phone with Direcway support with courteous support people. We finally decided after about 5 days that a new modem was needed. This decision was made on Thursday of last week. On Saturday night, the first modem began working perfectly with no adjustment on my part. I almost |
|
|
| called Direcway to stop the replacement on Monday but glad I didn't. The first modem stopped working at 9pm on Monday night. The replacement modem arrived on Wednesday, yesterday, and I installed it last night. It has been working perfectly now for a bit more than 12 hours. I'm keeping my fingers crossed that it will continue to work properly. The first three speed tests gave me 980+K download and 140-180+K upload. I can definitely see the difference over the DW6000. |
|
|
|
| February 15, 2006: Update .. this DW7000 modem has worked flawlessly since it's installation about a week ago. This gives me confidence in the satellite Internet system again since the second install went extremely easy and I can see that this was not my misunderstanding of the instructions but a flaw in the first modem.
Also, I'm not sure I ever reported on the ease of taking down and setting up the system. During our Oregon Coast trip I got plenty of practice. Take down is about 10 minutes and setup averaged about 15 minutes depending upon weather conditions and figuring where to set the tripod to avoid obstructions such as trees. The OPI meter was virtually worthless. I fooled with it for 3 hours my first time before calling Glenn. He reported that it can't be trusted and others were also having problems. I stopped using it and used Gwen's laptop computer instead to identify signal strength. I could do this at the tripod because we have a wireless router network. If you don't have a wireless network, you must use the "screamer" method where your partner yells out the window the signal strength. This method worked perfectly and quickly for us so we never tried the OPI meter again. If someone tells you it is manditory or that a "bird-dog meter" is needed, they are just looking for more profit.. |
|
| Saturday, January 16, 2010: OK, I had set a goal of doing without television for a couple of years but I've only made it 11 months. We have been watching some TV by our roof top antenna which was not a good idea. Our reception was never consistent. |
 |
| Some locations, like the Imperial LTVA near Yuma was very good on a digital converter box. Most other locations we've been, digital was not installed so we were watching fuzzy analog. That was so frustrating especially in trying to watch football, it drove us to give-in and get DirecTV satellite TV. We had Dish Network TV for three years with a separate satellite dish. I hated having to carry two dishes so this time I found a used BOW (bird on a wire) to connect to my existing Hughes Internet dish so now that dish will receive both Internet AND DirecTV. The BOW was surprisingly easy to install and the setting on the BOW arm brought the signal in without any adjustments. Now, I aim the Hughes dish for Internet as I usually do and DirecTV is automatically set correctly. Slide your pointer through the photo to see the view from the front of the dish. Yup, so now we have 200+ channels plus satellite radio channels to choose from. Did you know Australian Open Tennis begins tomorrow? We are fans of spectator tennis. And, of course the winter Olympics are in a few weeks too and we won't miss it like we did football this year. Note: we are 4.5 years into using satellite Internet and still going strong. |
|
|
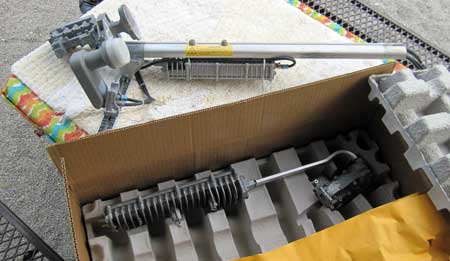 |
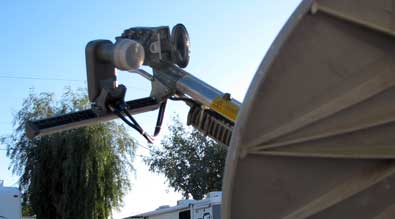
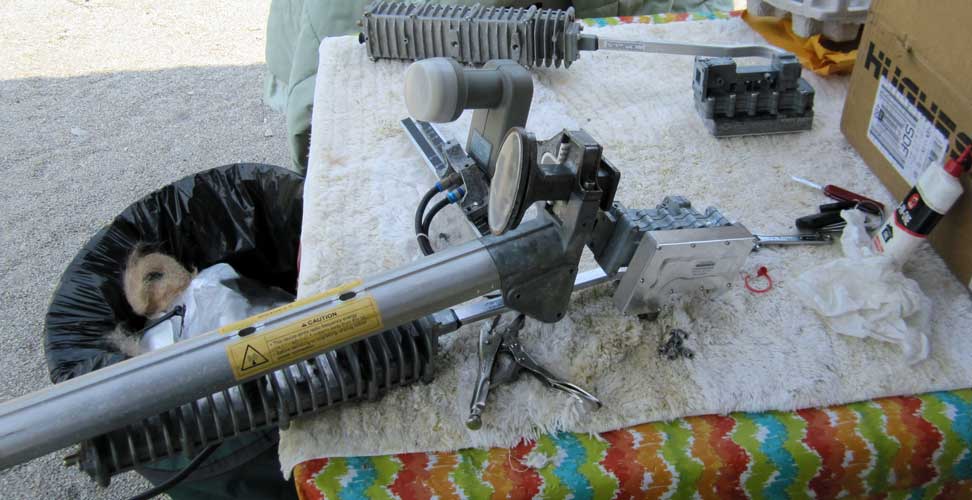
Thursday, June 9, 2011: The transmit part of the system has not been working. The satellite Internet Yahoo group suggested replacing the transmitter and the power supply. The transmitter arrived today while we are camped near Louisville, Kentucky. |
|
|
| It was a lot more work than I figured removing and replacing the 3mm bolts connecting the transmitter to the fog horn. Once completed |
 |
| it was a matter of reconnecting the coax cables. The system is NOT working so I'm hoping the new power supply will make the repair. I should have it on Monday. Just for your information, I no longer recommend satellite Internet for RV travel or for ANY use unless you have NO other option. We pay $70/month for this system which SHOULD operate at 1 meg download and 200K upload. It's rarely that fast, especially recently. My friends Ralph and Janet have a Verizon 3G modem/router so up to 5 computers can login at one time. I would estimate their speed at 5 times HughesNet and they pay only $40/month. The downside? Ralph and Janet traveled with us through Arizona, New Mexico, Texas, Louisiana, Mississippi, Tennessee and Kentucky. Their Verizon system was usable about 80% of the time since they must be in range of a cell tower. To be honest, our campsites in the southern states often had such a heavy tree canopy, we could not get satellite reception. In fact, we would login to their network when we couldn't get connected (due to the heavy canopy) and they would login to our network when they were out of range of a cell tower. So if you must absolutely must have Internet access each day, you need BOTH systems. Satellite Internet is still better than "dial up" access. So a situation where you MUST have satellite Internet would be where you are often camped out of range of a cell tower or permanently living in a rural area beyond 3G range. If that's not the case, go with 3G or 4G access, compared to satellite it's far easier plus much faster and cheaper. |
|
|
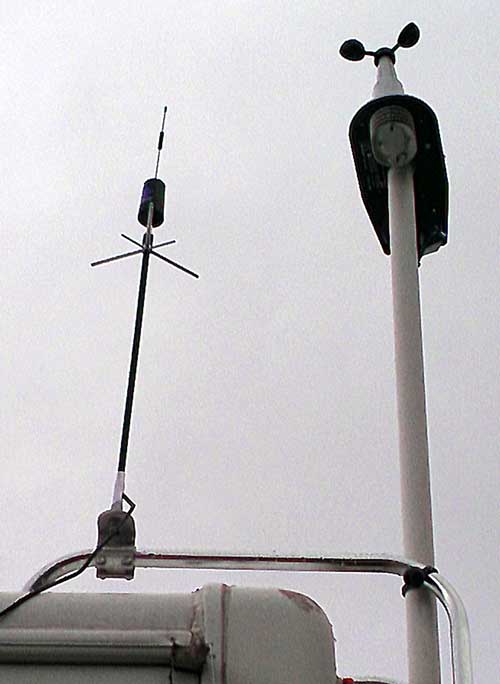
Friday, May 4, 2012: It has been almost a year since my last update on our satellite Internet. The short story is, we have given up on HughesNet after being with them since September, 2005. We have switched to Verizon Data Wireless. I explained a bit about it above, but plan to explain more now. First, I'll say that HughesNet has been reliable most of the time until the last 18 months. We have experienced problems, mostly with transmission, I changed the ends of the cables and that solved our problems until a week ago when the transmitter failed again. Rather than call tech support at HughesNet which is a lengthy process involving talking to a technician located in India, I chose to give up on satellite Internet. My recommendation is to use HughesNet ONLY if you will be camping where you have no other choice. Satellite Internet is expensive and slow. We paid $70/month for 1 meg download and 160K upload speeds. Much of the time the speeds would not even be that fast. We also had a limit of 350 meg download transfer each day before penalties applied. We purchased the Verizon MiFi modem/router at Costco. The unit was free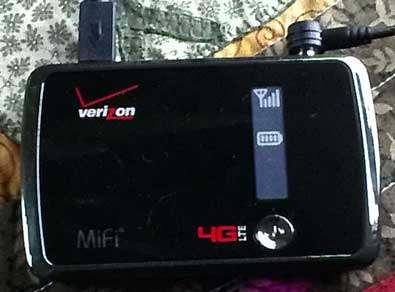 and Costco is reimbursing us for the $35 activation fee. We had to enroll in a 2 year program. We are paying for the 5 gig/month plan ($50) which means we are limited to 5 gig of transfer (both upload and download) per month before penalties apply. Connecting at 3G speeds, we should get about 1.5 meg download and 500K upload speeds. Verizon brags that with 4g we might get as much as 12meg download speeds. We've had the unit a week and have not been in a 4G area so can't say. In the photo you see a tiny antenna with 4 bars next to it indicating a strong signal. That's because an external antenna is plugged into the unit, without the external antenna, we get only ONE bar and very unreliable Internet speeds. You don't need an external antenna but where we are currently parked, it makes a huge difference. You can click the photo to see the antenna next to my Davis weather station. Using the MiFi for a week, I am surprised at how much transfer we have logged. We have nearly a full gig of transfer, which means 4 gigs in a month at our current rate. We are limited to 5 gigs without penalty so we must be careful about watching videos, downloading files (such as music downloads) and anything else that might be large transfers. We will know more as we've used MiFi longer. As for speed, the MiFi is noticeably faster than HughesNet as long as I'm using the external antenna. and Costco is reimbursing us for the $35 activation fee. We had to enroll in a 2 year program. We are paying for the 5 gig/month plan ($50) which means we are limited to 5 gig of transfer (both upload and download) per month before penalties apply. Connecting at 3G speeds, we should get about 1.5 meg download and 500K upload speeds. Verizon brags that with 4g we might get as much as 12meg download speeds. We've had the unit a week and have not been in a 4G area so can't say. In the photo you see a tiny antenna with 4 bars next to it indicating a strong signal. That's because an external antenna is plugged into the unit, without the external antenna, we get only ONE bar and very unreliable Internet speeds. You don't need an external antenna but where we are currently parked, it makes a huge difference. You can click the photo to see the antenna next to my Davis weather station. Using the MiFi for a week, I am surprised at how much transfer we have logged. We have nearly a full gig of transfer, which means 4 gigs in a month at our current rate. We are limited to 5 gigs without penalty so we must be careful about watching videos, downloading files (such as music downloads) and anything else that might be large transfers. We will know more as we've used MiFi longer. As for speed, the MiFi is noticeably faster than HughesNet as long as I'm using the external antenna. |
|
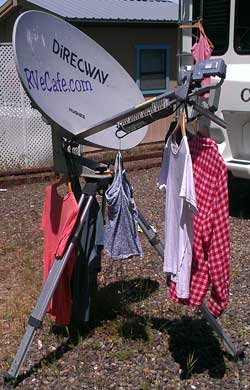
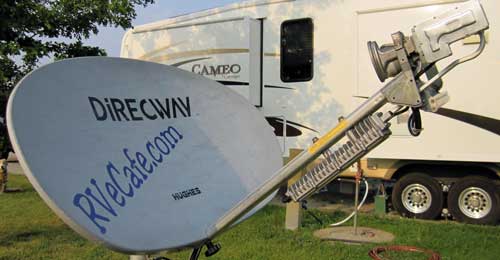
Saturday, June 2, 2012: Here is a use Gwen discovered for the HughesNet satellite dish. I can't get rid of it yet because I have a couple of months to go on the DirecTV contract and this is the dish I use to get DirecTV. Once that contract is fulfilled, then I should leave this dish somewhere. Right, we don't plan to continue the DirecTV contract either. It's just too expensive for the few times each year that we get the sports shows we like (such as the French Open Tennis match which is happening this last week and for another week). It's just crazy paying $85/month for TV with NO premium channels. |
|
Thursday, September 27, 2012: The time has come to dispose of the old DirecWay, HughesNet dish. I would have tried to sell the 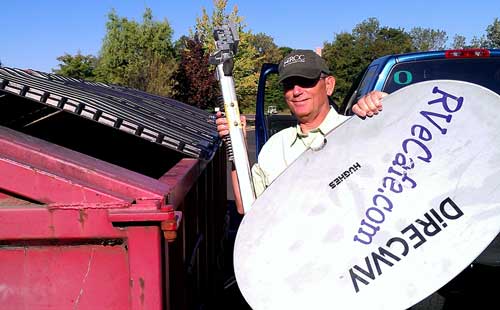 transmitter since it was about a year old but the last time I tried to connect with HughesNet, transmit would not work. It may not have been the transmitter which caused the problem but I have no way to know the cause of the problem since I no longer have a HughesNet account. The last year of using HughesNet has been very unreliable. When I purchased this system, I expected to use it for 2 years before something better and cheaper came along. Instead, I used it for six years. Now, the only reason I can see using satellite Internet is if there is no other choice. You are traveling into remote areas where satellite is the only option would be a reason to choose HughesNet. Otherwise, Verizon MiFi is faster and cheaper than HughesNet. transmitter since it was about a year old but the last time I tried to connect with HughesNet, transmit would not work. It may not have been the transmitter which caused the problem but I have no way to know the cause of the problem since I no longer have a HughesNet account. The last year of using HughesNet has been very unreliable. When I purchased this system, I expected to use it for 2 years before something better and cheaper came along. Instead, I used it for six years. Now, the only reason I can see using satellite Internet is if there is no other choice. You are traveling into remote areas where satellite is the only option would be a reason to choose HughesNet. Otherwise, Verizon MiFi is faster and cheaper than HughesNet. |
|
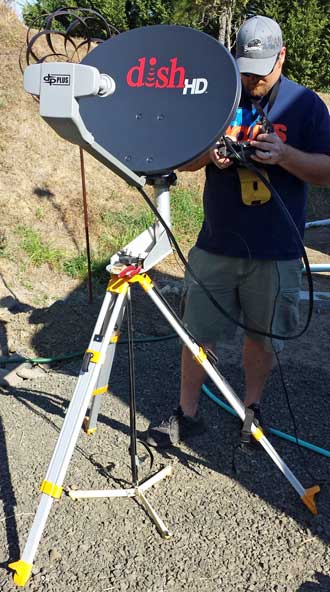 Sunday, September 7, 2014: I swore I was never going to have satellite TV ever again but I've had to retract my statement. The park will discontinue the Charter TV contract when it expires in a few months so we must come up with our own TV provider. We chose DISH Network because it is easier to point and we plan to move the service with us when we travel. Do you recognize some of the equipment in this photo? I gave away my "surveyor tripod" several months ago since I hadn't used it in 2 years so had to replace the tripod. I still had the "Claw" which anchors the tripod and the hardware for dish mounting and pointing. This system came with the "Hopper", the DISH version of a DVR (digital video recorder) with many new features from the last time we had a DVR several years ago. Many of the new features require Internet access which we will lose when we travel. Sunday, September 7, 2014: I swore I was never going to have satellite TV ever again but I've had to retract my statement. The park will discontinue the Charter TV contract when it expires in a few months so we must come up with our own TV provider. We chose DISH Network because it is easier to point and we plan to move the service with us when we travel. Do you recognize some of the equipment in this photo? I gave away my "surveyor tripod" several months ago since I hadn't used it in 2 years so had to replace the tripod. I still had the "Claw" which anchors the tripod and the hardware for dish mounting and pointing. This system came with the "Hopper", the DISH version of a DVR (digital video recorder) with many new features from the last time we had a DVR several years ago. Many of the new features require Internet access which we will lose when we travel. |
|
| |
|
|
|
| |

 and Costco is reimbursing us for the $35 activation fee. We had to enroll in a 2 year program. We are paying for the 5 gig/month plan ($50) which means we are limited to 5 gig of transfer (both upload and download) per month before penalties apply. Connecting at 3G speeds, we should get about 1.5 meg download and 500K upload speeds. Verizon brags that with 4g we might get as much as 12meg download speeds. We've had the unit a week and have not been in a 4G area so can't say. In the photo you see a tiny antenna with 4 bars next to it indicating a strong signal. That's because an external antenna is plugged into the unit, without the external antenna, we get only ONE bar and very unreliable Internet speeds. You don't need an external antenna but where we are currently parked, it makes a huge difference. You can click the photo to see the antenna next to my Davis weather station. Using the MiFi for a week, I am surprised at how much transfer we have logged. We have nearly a full gig of transfer, which means 4 gigs in a month at our current rate. We are limited to 5 gigs without penalty so we must be careful about watching videos, downloading files (such as music downloads) and anything else that might be large transfers. We will know more as we've used MiFi longer. As for speed, the MiFi is noticeably faster than HughesNet as long as I'm using the external antenna.